Solar panels have become common among homeowners as they help in saving money. Plus, they are good for the overall environment By replacing the equivalent amount of carbon dioxide from a similar fossil fuel powered system.
With the innovations in selling solar to the masses, solar panels have found new ways to be installed in homes, where it was once run on coal / natural gas [1]. Once you have installed solar panels, you don’t have to replace them for around 20-25 years as they produce almost 80-90% of electricity at the end of its 25 year
But it’s important to check the Solar Panel Output regularly for quality and safety. If you want your solar panels to last longer so they can generate solar electricity for years, consider preventive maintenance.
While testing solar panels sounds overwhelming, it is quite easy. This post will clarify doubts about the best ways to test solar panels.
Different Types of Solar Panels
Before we discuss the testing of solar panels, let’s check the types of available solar panels. Below are the common ones available for commercial and residential use.
#1 Mono-Crystalline Silicon Solar Panels
The mono-crystalline silicon photovoltaic panels are the ones that have polka dots on them. These are also available in a checkered pattern, with the smallest solar cells. It makes them the smallest yet most efficient type of PV panel. But these are pricey.
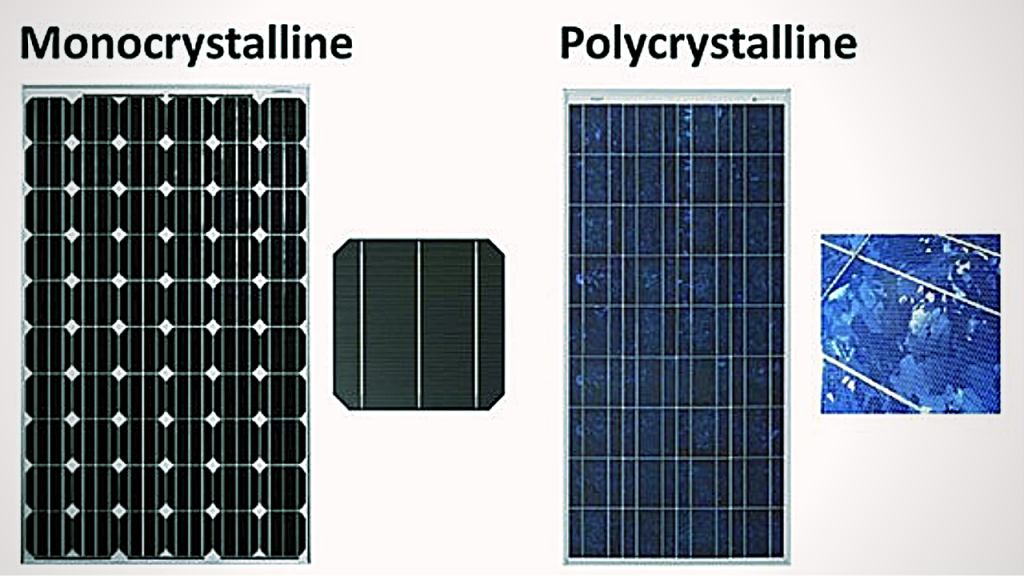
That’s because per square foot, they offer more solar panels energy production. Mono-crystalline silicon photovoltaic panels are great for roofs with limited space.
So, if the roof of your house does not have enough space, you can consider getting this one. While mono-crystalline silicon photovoltaic panels are expensive than polycrystalline silicon solar panels, , they are worth it.
#2 Poly-Crystalline Silicon Solar Panels
People prefer getting this one after mono-crystalline silicon solar panels. In fact, these solar panels have become a standard in Europe.
Comparatively, poly-crystalline silicon solar panels are a little bigger than monocrystalline solar panels. That means they need more roof space. These are also available at lower prices without compromised performance.
After the advancement in poly-crystalline cell technology, have emerged as the most efficient option. These have high heat tolerance, similar to mono-crystalline panels.
Poly-crystalline solar panels seem a nice option for a limited budget.
#3 Amorphous Silicon Solar Panels
It’s the third kind of solar panel, made of cells with a micro-thin layer of silicon. This layer is applied to the plastic or glass sheet. As these solar panels use minimum silicon, they are the least efficient.
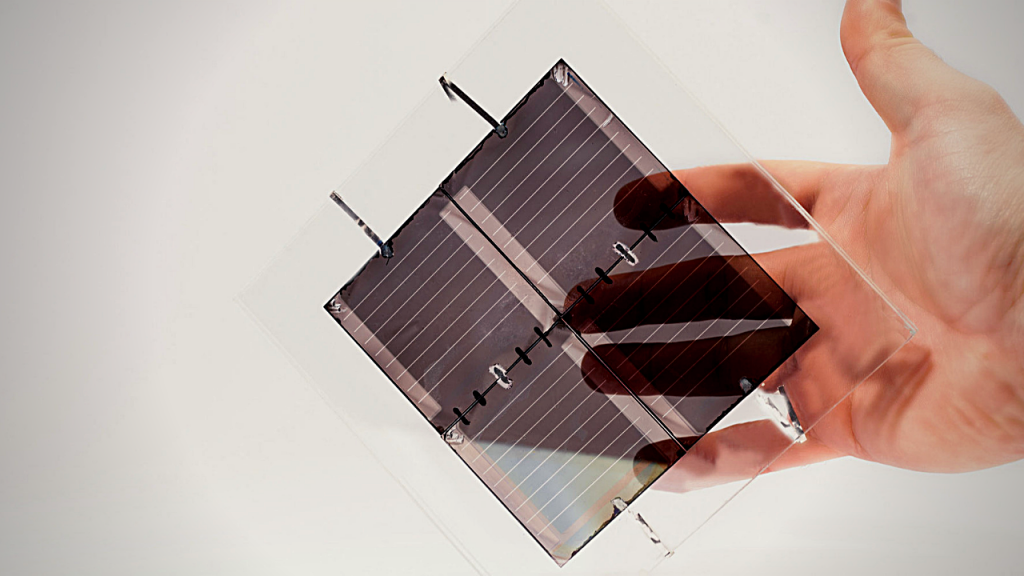
While these take less silicon in their solar cells, they take more roof space than others. So, if you don’t have enough roof space, you might not be able to make future upgrades with amorphous silicon solar panels.
If you want future upgrades, poly-crystalline solar panels are the right option. In addition, if you are tight on the solar roof space, mono-crystalline silicon solar panels are the right option.
One interesting thing about amorphous silicon solar panels is that they are far more durable than the two other solar panels. These are more versatile and can be installed on larger rooftops. Many commercial factories use amorphous materials because they are the lowest priced and can be installed on various roofs.
#4 Solar Roof Tiles
The last one is the solar roof tiles that take less space. You can easily install these tiles on the roof of your house or regular roof tiles without worry.

Why Must You Test Solar Panels?
After you have installed solar panels in your home, it’s important to test solar panels. Below are a few reasons that show why you must do it.
#1 Physical Damage
While solar panels can last for so many years. It’s possible that over time, they might get physically damaged. If left unchecked, vegetation can overgrow, causing damage to the wires that are connected to the solar panels.
There is also a possibility that rodents or smaller animals might chew on the grounding of wires. It might expose the copper wires, which can increase electric shock hazards. This can also bring down the performance of solar panels.
Lastly, birds dropping on solar panels, which might eventually cause greater damage. So, when you regularly conduct the electrical test, you can easily know the faults that might cause damage to the solar panel’s performance.
#2 Corrosion
As solar panels are installed on the house’s roof. They have to deal with harsh climates. So, there is a chance that the panels might get dirty from the regular exposure to elements. Sometimes, the dirt can cause corrosion.
Contamination and corrosion can impact the performance of solar panels, making them work poorly. You must check the solar cell power output voltage to understand the system performance and common issues. If the solar panels are rusting, you must take appropriate action.
#3 Compliance
Certain areas require the homeowners to conduct regular solar panel testing so the system stays compliant with the area. This law helps in getting periodic verification reports for repairs and improvements.
It’s seen that certain solar panels can be faulty. Also, the solar panels must be updated so they can obey the new rules of the standard change.
#4 Fire Danger
Solar panels are installed on the top of the roof to absorb the maximum amount of sunlight. But many times, solar panels might cause a fire due to faults in the electricity. So, if you avoid regular maintenance and check, your home and solar panels can risk catching fire.
#5 Warranty
Sometimes, regular testing of solar panels is needed to maintain the warranty. If the warranty asks for periodic testing, which you fail to do, you might not get the warranties you had been provided.
It can further increase solar cell replacing or repairing costs in the future. So, if you think you are saving money by avoiding regular testing, you are mistaken. Backsliding preventive testing can eventually stack up the cost.
#6 Effective Grounding
By regularly testing the solar panel, you can know whether the grounding is done properly or not. If there is an issue with the grounding, anyone might get shocked when coming in contact with a metal piece.
High voltage involves a high risk of injury.
#7 Environmental Degradation
Solar panels are always at risk of damage by natural elements. If the damage is caused by moisture, the solar panel’s performance might be greatly reduced. It can only be detected through regular testing.
Testing Solar Panels: How To Do It
Testing solar panels might sound complicated, but you can do it by understanding a few concepts. In addition, you need a measuring device for the work.
Through this section, we will help you learn the basic concepts of solar panels so you can conduct a simple and easy test. You must understand a simple formula and the variables used in the formula.
Using this formula, you can calculate the measurements that are an important part of solar cell testing. Here’s how the formula calculates solar power.
Solar Power (Watts) = Current (Amps) X Electric Potential (Volts)
#1 Current
Electric current refers to the flow of steam of electricity that moves through the circuit or electric conductor.
Current plays an important role in determining solar power. So, you just understand it to know the result of testing solar power.
#2 Amps
Amp is the unit that measures the electromagnetic force between the electrical conductor. It is the current measurement unit because it helps understand the quality of constant electric current. Higher amps indicate higher current strength.
#3 Wattage
The electric source’s solar power is indicated by watt. The rate at which amp current strength flows is called the watt.
#4 Voltage
The pressure that power sources exert through electricity is called electricity. A solar panel’s available and potential energy is measured in voltage. You can check the label on the back of the panel to know about your solar panel’s voltage.
#5 Solar Power Output
It combines to tell about a solar device’s exact electric, solar panel power output voltage. Solar panel power output is the amount of electricity a solar panel generates and delivers at a specific time. It is measured in watts and is essentially the solar power output measurement of a machine.
How To Know If A Solar Panel Output Is Working?
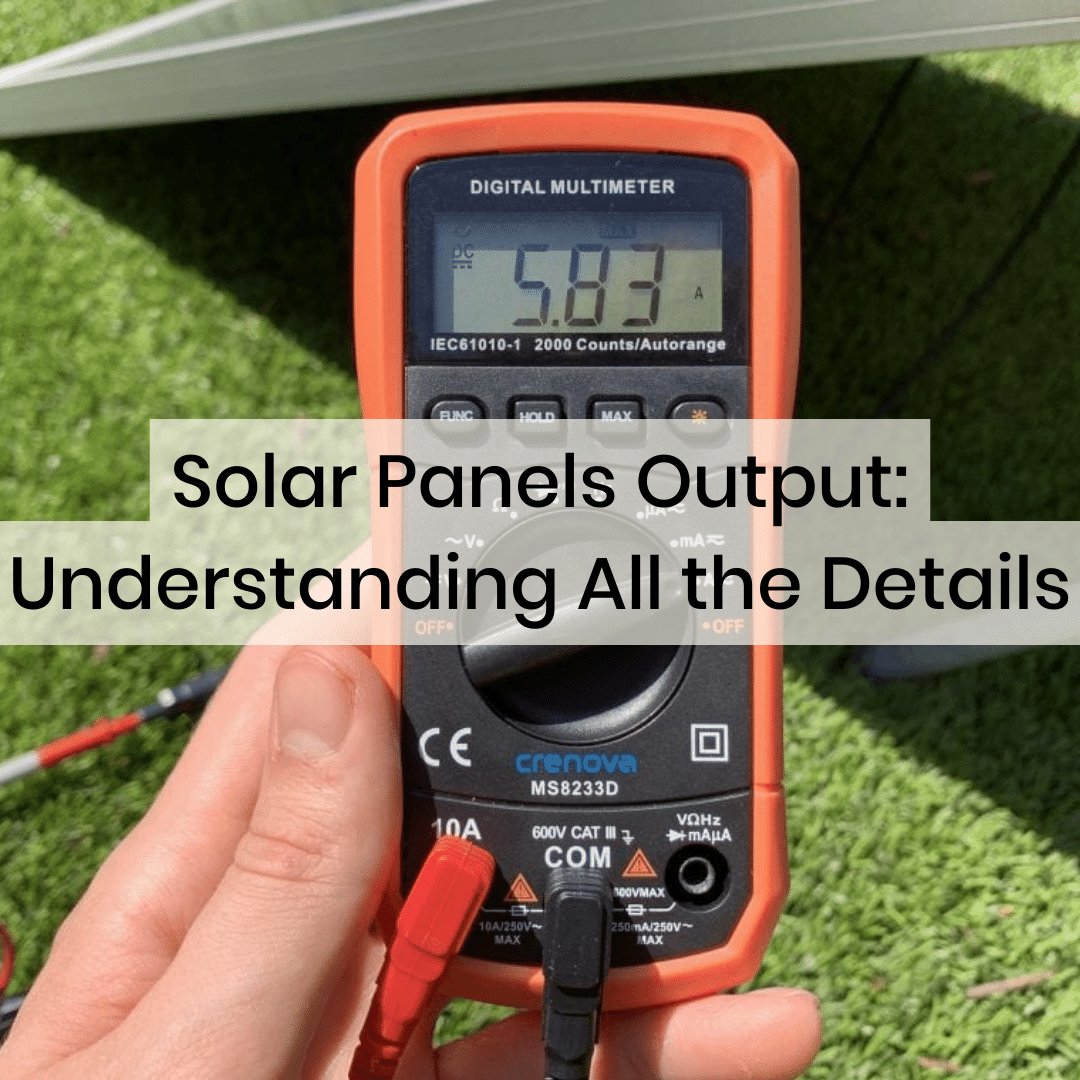
A tool used to test the current and voltage terminal of any device, including photovoltaic panel output, is called a multimeter. These are of two types, i.e., switched multimeter and auto range multimeter.
- Switched Multimeter: You can use this multimeter to get the most accurate reading by manually switching between the ranges. While using this tool, you must select the right function to measure different quantities. Set the tool to DC amperage to measure amperage. Similarly, to measure DC voltage setting, set it to voltage.
- Auto Range Multimeter: This multimeter automatically switches between ranges to find the best reading. It only measures the current and voltage.
While both multimeters have certain differences, they are known to perform the same functions, i.e., they measure the voltage and amps of the solar panel output.
If you incorrectly use a multimeter, you might damage the solar panel output. Right multimeter testing also helps you find the quality of panels.
#1 Locate the Converter Box
You need to locate the converter box that is present at the back of the solar panel. Try removing the cover of the box to check the connections inside.
#2 Master Positive and Negative Terminals
You must master the positive and negative connections for the right solar panel testing. After finding the connections, ensure that the solar panel receives direct sunlight. If it doesn’t have full sunlight exposure, try tilting it in the right direction.
#3 Set Multimeter to DC
Set the multimeter to DC power for measuring the solar panel’s suitable voltage reading level. See the inside of the converter box to know the approved voltage range for the solar panel.
#4 Connect Alligator Clips
Next, you are required to connect the red alligator clips to the positive lead side. Similarly, connect the black lead alligator clips to the negative side. Once you have made the connections, the multimeter will properly read the volts produced by the panels.
New solar panel will show a voltage similar to the approved one. But if the solar panel is old, its reading can be low. After switching off the multimeter, disconnect the alligator clips.
#5 Testing 12-Volt Solar Power
The testing method for 12-volt solar power can be similar as it is the most common volt rated for solar power. Properly connect the black alligator clips to the negative side and the red ones to the positive side.
Try keeping the readings correct by setting the best electronic fluke multimeter to over 200 VCD. If the multimeter shows function overload, the VCD must be adjusted to a higher rating.
Since not all multimeters are similar, they are likely tonal quality and monetary value.
#6 Testing the Charge Controller
While testing solar panels, you must also test charge controller panels. It is useful for solar plus storage. Try fully charging the battery. Otherwise, it might not accept the current passing.
For the first two measurements, the solar panels are used alone. You must disconnect the regulator before connecting the controller to the solar panel. After that, you can disconnect the battery from the controller.
Here’s how you can do it:
- Start the process by setting the multimeter to DC amps. At this point, you need to correctly connect the alligator clips so you can find DC amps.
- Try setting the multimeter to 10 amps.
- The third step requires you to connect the solar panel to the controller and the controller to solar batteries.
- The positive cable between the battery and controller must be disconnected.
- Try connecting the positive cable to the lead alligator clips from the multimeter to find the current.
- The next step requires you to connect the negative lead alligator clips to the battery’s positive terminal. This way, you can accurately measure the current flowing between the controller, solar panel, and batteries.
How to Know If a Solar Panel is Bad?
If you want to know if a solar energy panel is bad, try measuring Short Circuit Current (Isc). To measure short circuit current, disconnect the solar panel completely from the battery and regulator.
With this test, you can know about any danger that can tell about the condition of a solar panel. Keep reading to learn how to calculate open circuit voltage.
- Start by reading the specs label to know the Isc measure in amps.
- Then you need to change your multimeter to amps charging. Make sure your multimeter’s fuse is larger than the solar energy panel’s short circuit. This way, you can eliminate the issue of overloading short circuit current Isc.
- Keep the solar energy panel in a direction, so it is facing direct sunlight.
- This step requires you to connect your multimeter probes to the MC4 connectors.
- Check the amp reading to see whether or not it is close to matching the short circuit current rating on the solar panel. Disconnect solar energy panel from battery and regulator to measure open circuit voltage.
- If the value is close, your solar energy panel is not bad.
- To measure operating current, connect the panel to the regulator and battery.
Common Solar Panel Problems
If your solar panel passes the test, you must take good care of them. Below are some common problems that solar panels might encounter.
#1 Faulty Wiring
Any slight issue in the solar panel can prevent it from performing well. Thoroughly check the panels. If you find any loose connections or corroded cables, it’s better to call an expert to get the issue repaired professionally.
#2 Cracks On Panels
Besides faulty wiring, cracks on the panels can also cause a huge problem. Sometimes, the crack can be tiny, but the harsh weather can make the damage grow more extensive over time.
Small cracks will likely occur when the solar panels are mishandled during shipping. So, purchasing the panels from a professional company is advised so you don’t have to deal with any cracks.
#3 Hot Spots
Your solar panel can be at risk of a hot spot if they get overloaded or overheated. Hot spots can be dangerous because they can destroy the solar panel and harm its performance. The spots are generally caused by poorly soldered joints or piles of dirt.
#4 Birds Living Under the Solar Panel
There might be a chance that birds are living under your solar system. If this is so, birds might scratch the panels or damage cables. To deal with this issue, you can consider using plastic strips. Or you can install roof-integrated panels. This way, there will be no gaps for the birds to make a nest.
#5 Inverter Issues
Solar panels are known to last longer, but the inverter that comes with the panel has a shorter lifespan. After 10-15 years, you must change the inverter to boost the solar panel’s performance.
You can check the manufacturer’s terms to see whether or not the inverter can be replaced if it starts showing early problems.
#6 Roof Damage
If you properly install solar systems, they can cover your home’s roof nicely. They can cover any visible damage and roof rots. That means solar panels can increase the lifespan of the roof of your house.
But if the panels are incorrectly installed, they can damage the roof. That’s why you should always hire an expert for the installation work.
#7 Snail Trail Contamination
Snail trail contamination refers to the discoloration of the solar system. It happens a couple of years after installing the panels on the roof. Many factors can result in a snail trail, but metallization solar paste does the most damage.
It can cause moisture in the panel, leading to oxidation between the silver paste and encapsulation material, called EVA. This process can release silver oxide and hydrogen.
The chemical becomes visible as snail trails, which decreases the solar panel’s performance. Certain microscopic cracks can also cause snail trails.
#8 Internal Corrosion
When moisture penetrates between the panel, internal corrosion takes place. That’s why you must keep the panels air-tight and water-tight. You must purchase the panels that are laminated under vacuum.
But if the lamination is not done properly, it can delaminate. If this happens, moisture can enter the panel, which will be visible as a darker spot. The moisture starts from the edge of the panel and slowly spreads, causing great damage.
The solar panel’s performance can be significantly reduced if there’s corrosion on the metal part. Frameless and thin PV solar panel can be greatly affected by moisture.
#9 PID Effect
PID means potential induced degradation, which can be caused by a voltage difference between the panel and earthing. A solar panel is usually earthed to avoid any injury. But it can cause a difference between voltage and earthing, damaging the panels.
The ongoing difference can reduce the acceleration and performance of PV panels. It is revealed that the PID effect can degrade solar performance by up to 10%.
Conclusion
When testing your solar panels, remember it’s quite easy and, You can correctly test the panels even without any experience. Before starting the testing, you must know the basics to understand how solar panel work.
By learning how to test solar panels you can ensure that you don’t waste your time installing panels. You must calculate open circuit voltage.
Know how to work with a multimeter to get a correct reading. While testing your solar panels, don’t forget to text the charge controller. An efficient charge controller means the batteries are in good condition.